The ability to keep track of your emails within ACT! is huge, but what if you use a web-mail service such as GMail? Following are instructions for getting GMail messages - both inbound and outbound - connected with ACT!
There are 3 main steps - enable IMAP in GMail, set up Outlook to access GMail, and then set up ACT! to work with the new Outlook/GMail account. The first step is Google specific, the last step is needed for *any* e-mail account setup to work with ACT!, it is not necessarily GMail specific. There is really only one area that is different than other e-mail accounts, and that is the IMAP settings. [Note: Once Outlook is setup, the ACT!/Outlook link is the same for any e-mail account - ACT! does not care if it's GMail or whatever.]
GMail Account setup
1. Set up a GMail account. (I suspect you have already done this.)
2. Enable IMAP in GMail
a. Sign in to GMail.
b. Click Settings at the top of any GMail page.
c. Click Forwarding and POP/IMAP.
d. Select Enable IMAP.
Outlook Access to GMail Account
3. In Outlook, go to Tools > EMail Accounts
a. Click radio button “Add a new e-mail account”, then click Next
b. Click radio button IMAP, then click Next
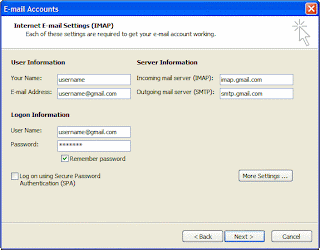
4. You should have a small(er) window open with various “information” boxes. Fill in all necessary fields to include the following information:
User Information
Your Name: Enter your name as you would like it to appear in the From: field of outgoing messages.
Email Address: Enter your full email address (username@gmail.com).
Server Information
Incoming mail server (IMAP): imap.gmail.com
Outgoing mail server (SMTP): smtp.gmail.com
Login Information
User Name: Enter your full email address (including @gmail.com or @your_domain.com
Password: Enter your GMail password.

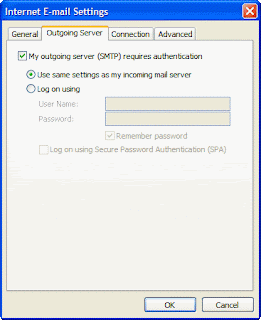
5. Click More Settings… and then click the Outgoing Server tab.
6. Check the box next to ‘My outgoing server (SMTP) requires authentication’ and select Use same settings as my incoming mail server.

7. Click the Advanced tab, and check the box next to ‘This server requires an encrypted connection (SSL)’ under Incoming Server (IMAP).
8. Check the box next to ‘This server requires an encrypted connection (SSL)’ under Outgoing Server (SMTP), and enter 465 in the Outgoing server (SMTP) box.
9. Click OK.
10. Click Test Account Settings… After receiving the message ‘Congratulations! All tests completed successfully’, click Close.
11. Click Next, and then click Finish.
ACT! to use Outlook/GMail account
1. Tools > Preferences, then click the E-mail tab
2. Click E-mail System Setup button
3. Choose Microsoft Outlook as your E-mail system
4. Add the ACT! database you would like Outlook to access
5. Choose Microsoft Outlook as the E-mail editor
6. Choose Record History option (I chose to stick with “recommended” settings)
7. Choose Attach to ACT! Contacts options (”recommended” on these as well)
So that’s basically it. I would recommend also restarting both ACT! and Outlook to get them working in sync. To verify it is working, click an email address within ACT!, and it should open an Outlook new message window, then from Outlook attempt to attach an email message to a contact within ACT!


No comments:
Post a Comment