10 December 2009

Attach a Web Page to an ACT! Contact

A little known, but very useful feature in ACT! and Internet Explorer is the ability to attach the current web page you are viewing to a specific contact. This can be used to save a specific story about a company, news about a contact, a GMail message, or a blog post from a colleague.

This integration is intalled by default when you install ACT!. You can find it in Internet Explorer under the Tools Command Bar. This is not the menu bar (i.e. File/Edit/View…), rather is usually found towards the right-hand side of the screen, just above the actual web page. If you have tab viewing implemented, it might also be on that same level.


Click on that menu item, choose Attach Web Page to ACT! Contact, which will bring up, from ACT!, the Select Contact window. Choose a contact, and click OK.


Hope this helps, thanks…

03 December 2009

Send GMail directly from ACT!

Basically, over the last year, I have received numerous inquiries into integrating GMail with ACT! I have blogged about integrating via Outlook, but often people either don’t want to use Outlook, or don’t have it. This add-on addresses both those issues.

Features:
  • send mail directlyfrom ACT! through GMail
  • HTML editing window
  • supports attachments
  • automatically populates To: field from current contact
  • HTML Signature - even with images. GMail does not even do that!!!
  • save/open messages as templates
More info and screenshots are at http://www.rbrdatasolutions.com/products.htm

The add-on creates a new menu item under Tools called WebMail Sender. It is also a toolbar button. Choosing that option will bring up what essentially is a New Mail Message window, with the email address of the current contact in the To: field. Now, fill in the Subject, the body of the email, (and CC: if desired), and click Send.

After sending, if successful, a new History item will be recorded with the date & time, and the Subject of the email as the “Regarding” line in the History item. Additionally, the Last E-Mail system field in ACT! (on top half of screen, under Latest Activities) will be updated. If selected, the body, and names only of the attachments will be recorded in the same History entry.

Please check it out at http://www.rbrdatasolutions.com/products.htm Thanks!!!

26 October 2009

New vCard Utility released

An update to the popular add-on for ACT! 2007 - 2009 (versions 9 - 11), the new vCard Utility not only sends contact information by automatically attaching a vCard to Outlook, it now Saves to File… vCard information, and Imports a vCard into ACT!, creating a new contact record.

More information can be found at http://www.rbrdatasolutions.com/products.htm

Thanks!

06 October 2009

Time Zone and Scheduling Activities

Often ACT! users either share, or synchronize information with other users across different time zones. How do you schedule a conference call with 5 people in 3 different zones? What happens when you send an activity email, or calendar invitation to another user?

Luckily, this is something ACT! takes care of automatically, and you don't need to worry too much about it. ACT! stores times in UTC (Coordinated Universal Time), or GMT (Greenwich Mean Time). Basically, ACT! will store the GMT time, and the localization preferences on your computer will determine the time zone (TZ) offset. In short, based on your computer settings, the ACT! program takes the data (date & time in the database), converts and displays it correctly for you, and any other users to see.

How does this work in action? Let say I have a conference call Friday, October 7th at 11:00am. I put that on my ACT! calendar at *my* time, not converting or adding time zones of the other users. However, if you open the hood and look into the database, you will see the time stored as 2009-10-07 18:00:00 So, if I synchronize with a user/server in another time zone, that date is *still* stored as 2009-10-07 18:00:00 ACT's back-end database (SQL Server) does not care what TZ the computer is in, it's up to the ACT! program itself to convert and display the date correctly. Now, when the user accesses that data on their computer, ACT! automatically converts it to their local time. If they are in Boston (go Sox!), they will have a conference call scheduled at 2:00p, on October 7th.

Sending an Activity eMail, or a calendar file invitation works the same way. Although I can't help if someone in Boston schedules an 8:00am (EST) conf call for colleagues in California (5:00am PST), I do hope this helps you use ACT! more efficiently.

Note: There is one caveat to this system. If you are in one time zone (e.g. CST) scheduling *for* someone in another (e.g. EST), you *will* have to take that into account. i.e. If someone in Pennsylvania specifically says "schedule a meeting for 9:00am", you will need to add it on your computer at 8:00am if you're in CST, 6:00am if you're PST, and so on. When ACT! syncs, they will now have an appointment for 9:00am.

22 August 2009

Send contact information as vCard from ACT!

Have you ever wanted to send either your contact information (the “My Record”), or another contact’s information to someone else? I have had a few inquiries asking how to do this, and unfortunately using Outlook and ACT! it is not possible. So, I have created an ACT! plugin that:
  • gathers a contact’s main information,
  • formats it according to vCard standards,
  • creates a new email message, and
  • attachs the vCard to that message.
More information and some screenshots are at:
http://www.rbrdatasolutions.com/products.htm

This is the first version, written based on the feedback from current clients. If you’d like something added, please feel free to send me a message @ rbrDataSolutions@gmail.com

Thanks!

06 August 2009

Automate Scheduling with Activity Series

An activity series allows you to schedule a pre-defined series of activities with one or more contacts, as well as select an "anchor" date for all activities in the series. Then, by scheduling the anchor event, *all* other events (activities) are automatically scheduled.

Before jumping in to using the function, it is helpful to ensure all the activities related to you, and your business, are defined. The Activity Series only uses the activities currently in the database (i.e. call, meeting, to-do), so if you have something unique to your business process (i.e. Conference Setup, Follow-Up email, Send Quote, etc), define those first.

So, for starters, go to:
Schedule>Manage>Activity Types

The current set of activities will show up, click Add... to customize to your business processes. You can add what you want, but often it's helpful to prefix the activity with the business process as well. E.g. if you have a follow-up email that goes out, and the email is different depending on where the contact came from, you could have a "Conf - eMail", and a "Cold call - eMail" activity. This way, you can define Activity Series for all business processes, not just a generic "eMail" task.

Now, after defining a set of activities, go to:
Schedule>Manage>Activity Series Templates

Follow the series wizard, adding activities as needed. Note that you can also schedule any one, or more, of the activities "for" any other person in your organization (this is the bottom 1/3 of the Activity Information window). A call could be scheduled for you, a letter for the secretary to send, and so on. When you are finished, that series is now available to be scheduled.

Go to: Schedule>Activity Series, chose the series (template) you would like to schedule, the anchor date, and if desired, click on any of the activities, and change the "Scheduled With" (middle of the window). [Or, highlight all of the lines, and change them all at once.] Basically, when scheduling an Activity Series, all activities in that series default to "Schedule With" the contact you are currently viewing. Being able to change the "Schedule With" allows you to choose another contact - e.g. the email task might go to the person you met at the conference (Bob @ XYZ, Inc.), the media packet mailing might go to the president (Frank @ XYZ, Inc.), and so on.

Hope this helps. Again, if you find yourself repeating the same task over and over, or you think "ACT! should do this automatically", you are probably correct. ACT! has many built-in capabilities - let ACT! make life easier.

20 July 2009

Inexpensive or Free Communication Methods

Normally this blog is about ACT!, but since most of my clients are individual users, small companies, or “smaller” divisions of companies - all of who are constantly looking for more ways to operate more efficiently and stretch their budgets - I thought this might help open up a few new ways to use technology to your advantage.

Over the last few weeks, I have come across a number of people - business and personal - that have needed to communicate either long-distance, or overseas, but did not want to break the bank doing so. Personally, I have an unlimited cell phone plan, so calling domestic is not an issue, however, overseas is another story. I’ve travelled extensively in Europe, and know what cell phone charges can be when calling back to the states. So, how does one do this frugally, while being able to utilize a professional connection. If you don’t have unlimited cell phone minutes, or just don’t like using the cell for every call, this might be for you.

There are three tools that I’ve used, and all are excellent, and free - Skype, Google Talk, and Yahoo! Messenger.

Skype - This is (or could be with all the options) a full telephone package - send/receive calls, video calls, SMS, call domestic and international “regular” numbers (small fee), and Skype-to-Skype calls. You can even get a phone number for a minimal charge, eliminating the need for a land line. I use this program for long distance if I just don’t want to use the cell phone, or for domestic/international Skype-to-Skype calls, which are free.

Yahoo! Messenger and Google Talk- basically the same program with similar functionality, just different vendors. I have both, and use both, and performance seems very equal. You might know of these programs as just for IM-ing, or instant messaging. However, with either, you can “call” another computer, video call another computer, and of course send IMs. In Google Talk, calling another computer will actually “ring” that computer, and when the other person picks up, you have a voice connection. Very cool, below is GTalk’s buttons on an IM window:


I have used Yahoo’s talk feature while working in Mexico to talk with engineers in Germany - all at no charge.

In addition to these free programs, there are two other services I use or recommend that will help keep costs down - VoIP and GoToMeeting.

VoIP is phone service over your high-speed internet connection. Being an IP connection, there are a few options available on these types of phones that are not on typical phone systems (or at least not available at the same price point). There are interfaces available where you can view the status of all users, call and IM/SMS those users, transfer calls or dial extensions to remote users as if they are within the same building, and so on. Additionally, there are cost savings vs a regular phone line, or lines. A bit more than I want to cover here, just FYI for you to look into.

GoToMeeting is a monthly subscription to a PC-PC sharing service. I use this constantly for support & training, installation, general help, and other activities that would normally have required an onsite visit to a client, or worse - an hour phone call to describe how to fix an issue. No business person want to sit on the phone for an hour clicking away when it could be done (by someone else) in 5 mins. With GoToMeeting, I can connect remotely, see the other user’s desktop, and take care of the issue promptly. Additionally, GoToMeeting is very useful for training or demonstrations to multiple users.

Hope this info helps…

22 June 2009

Using ACT! Reader & Microsoft Access to read ACT! Data

Using Excel OLE/DB is a very quick and easy way to get data out of ACT! for reporting or analysis. However, this method is constrained somewhat by the pre-defined views that are available for use. If you need more data, or more detailed data, you might want to look into using the ACT! Reader utility, which opens up ACT! data to be used via ODBC.

Note: ACT! Reader is only available to ACT! Premium users, or those who purchase the utility.

So, the quick and dirty instructions to getting this to work. (I am assuming you have some familiarity with Access and ODBC.)

  • Open ActReader.exe. This utility is used to set a password on the SQL Server instance that the ACTReader "user" will use for an ODBC connection.
  • Open Microsoft Access. We will be using this in our example, but you can use other tools, I prefer Access.
  • Go to External Data>More>ODBC Database
  • Choose Import, or Link tables, then OK
  • Click the New button to Create a New Data Source (File or Machine - does not matter)
  • Choose SQL Server for the driver
  • Create a name, and description for the data source. The Server can be any machine, but if you are running ACT! locally, choose your machine. Also, append ACT7 to the end of the machine name. e.g. MYLAPTOP\ACT7
  • Click the "With SQL Server authentication..." radio button.
  • Login ID is "ActReader", and password is whatever you set using the utility.
  • Change the default database to the ACT! database you would like to work with

After Finishing, you will be presented with all the tables in the ACT! database. You can now use them like any Access table - build a report, application, analysis, etc. For example, I created an application for project and time tracking. Certain ACT! users are tagged with a Yes/No field in ACT! that sets them to an "active" status. Then, in Access, I created a macro to import *only* those contacts with the field set to "Yes", and append them to the master table in Access, which is the cornerstone for the tracking system. This way, I always have the most current contact data in Access, directly from ACT!.

Hope this helps!!!

14 May 2009

Using Notes vs. History

History and Notes are two quite different things. History is for tracking everything you’ve done with the contacts in your database… emails you’ve sent, calls you’ve made, meetings you’ve had, letters you’ve written, etc. It’s for recording the day-to-day history of your relationships. Notes are more general - useful for tracking impressions of a person or business or recording more long term items of interest.

Notes and Histories need to be separated as uniquely different. An ACT! Note should only be used for commentary regarding the contact. It should not include any information regarding any action that has occured. Consider using notes for commentary such as likes and dislikes, product preferences, personal highlights, etc - generally for those things you want to remember or reference quickly.

On the other hand, History is the audit trail of the things you have done for a contact - a chronological accounting of all things that have been done with or for the contact. It is the point of true “contact management”. A completed call and held meeting history will automatically update fields on the contact screen labeled as Last Reach and Last Meeting. These fields are searchable, sortable and reportable.

A few more differences:
  • Unlike Histories, Notes cannot be categorized. There is no Regarding field for a note.
  • Second, Notes do not have a classification or status such as Call Completed, Call Left Message, Meeting Held, To-Do Done, etc.
  • Third, Notes do not have a field to track duration. How much time did this activity take?
  • Fourth, Notes do not update system fields like histories such as “Last Reach” or “Last Meeting” thus making it harder to determine when the last ‘true’ contact or touch was made.
Separating Notes from Histories is smart if the user understand the difference between the two. Instead of simply typing a note the next time a contact calls you, right mouse click and choose “Record History” (anywhere on the contact record), or use the icon on the history tab (see below). Over time you will be glad you did.

20 April 2009

Utilizing Group Membership effectively

Often I run across users that manually add and delete members from a group based on certain criteria. It could be the state they are in, the "type" of contact with which they are working, or the status based on where a prospect is in the opportunity cycle.

If you find yourself performing the same actions, or repetitive actions on a regular basis, that is a signal to look at your program and find out if what you are doing could be automated.

Groups in ACT! can be populated by something called a dynamic query. Here's the quick directions to get started:
  1. In the Group window, create a new group called Opportunities, then on the right-hand side, click the Add/Remove Contacts... button
  2. The top half of the window is where you may have been manually adding contacts. What we want is the bottom half, labelled "Dynamic Members"
  3. Click the Edit Criteria... button
  4. Create the following using the drop down boxes: Type: Opportunity, Field Name: Status, Operator: Equal to (=), Value: Open
  5. Click Add to list, and if desired, click the Preview button.

You have just created a dynamic group, and any contact where an opportunity is opened will be automatically added, and a contact where an opportunity is closed or removed will not be incuded in this group. There are many options with both the Opportunities and Contact fields to help you manage groups of contacts more effectively.

p.s. it is totally possible to have both Dynamic and manually added contacts.

23 March 2009

ACT! Reporting using Excel with OLEDB

Sounds confusing for the non-technical user, but once set up, this functionality can be extremely helpful. Furthermore, if you need data formatted/reported on using specific calculations or parameters, automating with macros or Visual Basic can prove to be an incredible time-saver.

The first couple steps of getting OLEDB setup is a bit different depending on which version of Excel you are using, so here’s a quick start for 2003 and 2007 versions.

Once set up, you can reuse the connection, so this does not need to be done every time!
  • 2003: Data->Import External Data->Import Data
  • 2003: Click “New Source” button
  • 2007: Data->From Other Sources->From Data Connection Wizard
  • following are common steps for both versions
  • Choose Other/Advanced, then Next
  • choose Provider as “ACT! OLE DB Provider for Reporting“, click Next
  • choose a database file (e.g. *.PAD file), fill in User Name and Password if necessary
  • Test Connection if you want, then click OK
You will now be presented with all the available tables. Choose one specific for reporting, or uncheck the “Connect to a specific table” option, which will allow you to go back and pick other tables using the same connection. Personally, if you are setting this up for automation, you will most likely have one table in mind. Click Next to choose a File Name under which to save this connection, add a description, and click Finish.

Now, here’s the fun part. You can leave the settings of the “Import Data” pop-up as-is, and it will import all the data from the table into a “table” grid in Excel, or choose to create a Pivot Table or Chart directly from the new connection, or Edit Query, limiting the subset of data imported into Excel. The table is pretty straight-forward, and the Pivot Table/Chart creation is outside the scope of this blog (but is inevitably is the end result - so if you aren’t familiar with them, get familiar!) I want to finish by going over the Edit Query option, as that will help limit the extra/excessive data you do not need in a report.

In 2003, on the Import Data pop-up, click the Edit Query button. In 2007, on the Import Data pop-up, click Properties, and then the Definition tab. Change the Command Type to SQL, and change the Command Text to:

SELECT "Contact Contact", "Contact Company", "Contact ID/Status"
FROM "ACT11Demo"."dbo"."VRP_CONTACT"


This limits the data to just Contact, Company, and ID/Status info. Of course, from there we can create a Pivot Table if needed, perform any analysis functions, or whatever else is desired.

Hope this help you better utilize the power of Excel accessing and reporting on ACT! data…

p.s. In Excel 2003, if you go to Data->Import External Data->Import Data again, your saved connection will be there. In Excel 2007, it’s Data->Existing Connections that will bring up the saved connections.

03 March 2009

Whitepaper - Relationship Between Social Networking & Business

For those of you who Blog, Twitter, Facebook, and more, a very interesting Whitepaper from Forrester about how social networking is impacting business in a positive way.

Definitely a must read for those of us who are in the technology services, but the some of the main points relate to all avenues of online B2B marketing.

Click to download:
Social Technographics of Business Buyers.pdf

19 February 2009

ACT! and Outlook email processing – Behind the Scenes

In this blog, I’d like to review some key characteristics of this feature. It often works behind the scenes with little operator intervention, but occasionally you will need to know what’s happening, and why.

Act.Outlook.Service.exe
First, the Act.Outlook.Service.exe is not technically a service – it is a program that is started on log in. You can verify that it is set to start automatically by going to Start>Run, then type in MSCONFIG in the Run box. When MSCONFIG appears, click on the Startup tab, and look for Startup Item “Act” (there may be more than one) and the Command “C:\Program Files\ACT\Act for Windows\Act.Outlook.Service.exe”. If it’s checked, it will start. [Note: “Act for Windows” may also be “Act for Web”]

So, what does this program do? When you send an email from ACT!, this process takes the email address, matches it with the email address of the contact, and attaches the email to the contact history. Exactly *what* it attaches will be discusses a bit later.

When you receive an email, there are three things that can happen:

  1. If you have an Outlook rule setup to attach, that rule determines if the email address of the contact can be matched in the ACT! database, and if so, will attach the message.
  2. If you don’t use an Outlook rule, you can either use (manually press) the Quick Attach icon which will match the email address(es) to determine a match, or
  3. You can use the Attach to Contact icon which will attempt to match the name with an ACT contact name.

If any of these processes are successful, you may see an icon in the taskbar area appear and disappear quickly. This is good, if it disappears, the process was successful. However, if the process fails, you will see this icon:


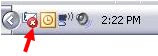
This is telling you *something* failed. Right click on this icon, and choose Show Progress. This window has three tabs:
- Progress: these are successfully attached messages
- Advanced: settings for the log files
- Not Attached Messages: this is the tab you want. It will show messages that did not get attached, and tell you why (i.e. “Status” column).

Not Attached Messages
The next item I’d like to discuss is what happens to the emails during and after this process. There is actually a middle behind-the-scenes process that copies the email to a temp file, and if the attach is successful, that temp email file is deleted. If the attach fails, a copy of the email is kept in this temp file, and ACT! will continually attempt to find a match. Well, you can imagine what happens after months go by and you have numerous failed attempts. Not only does the temp directory get filled up with old email files, the Act.Outlook.Service.exe process starts to run longer and longer, eventually causing resource issues.

This directory can be found at “C:\Documents and Settings\%user%\Application Data\ACT\ACT for Web\HistoryQueue”. Under that directory are messages that have not been attached, usually with the name tmp**.msg (where the two asterisks are a number or letter). One more directory down, under Holding, are related XML files. All of these can be deleted if you want. Once they are gone, ACT! will no longer attempt to process them.

Alternately, you can highlight one or more of the messages and click the “Remove” option. This takes care of all the files in the queue. Obviously, this option is preferred, and easier.

Sensitive eMails – what exactly gets recorded
In ACT! under Tools>Preferences and then the E-Mail tab, if you go through the E-Mail System Setup, there are options to keep the messages (inbound and outbound) private, and options to recorded nothing, the subject, subject/message, or subject/message/attachments. These same options are available on a toolbar in Outlook when you are composing a new message. The options in ACT! are database-wide, when set they apply to all messages, the options in Outlook are message specific, so can be used to override the ACT! defaults.

For example, in ACT!, if you have the settings for all messages “Public”, and to record the subject and message body, but are sending something sensitive, when you are composing the email in Outlook, either choose “Private”, or choose to record nothing.

Hope this helps you understand this process better…

07 February 2009

ACT! and GMail integration

The ability to keep track of your emails within ACT! is huge, but what if you use a web-mail service such as GMail? Following are instructions for getting GMail messages - both inbound and outbound - connected with ACT!

There are 3 main steps - enable IMAP in GMail, set up Outlook to access GMail, and then set up ACT! to work with the new Outlook/GMail account. The first step is Google specific, the last step is needed for *any* e-mail account setup to work with ACT!, it is not necessarily GMail specific. There is really only one area that is different than other e-mail accounts, and that is the IMAP settings. [Note: Once Outlook is setup, the ACT!/Outlook link is the same for any e-mail account - ACT! does not care if it's GMail or whatever.]

GMail Account setup
1. Set up a GMail account. (I suspect you have already done this.)
2. Enable IMAP in GMail
a. Sign in to GMail.
b. Click Settings at the top of any GMail page.
c. Click Forwarding and POP/IMAP.
d. Select Enable IMAP.

Outlook Access to GMail Account
3. In Outlook, go to Tools > EMail Accounts
a. Click radio button “Add a new e-mail account”, then click Next
b. Click radio button IMAP, then click Next
4. You should have a small(er) window open with various “information” boxes. Fill in all necessary fields to include the following information:

User Information
Your Name: Enter your name as you would like it to appear in the From: field of outgoing messages.
Email Address: Enter your full email address (username@gmail.com).

Server Information
Incoming mail server (IMAP): imap.gmail.com
Outgoing mail server (SMTP): smtp.gmail.com
Login Information
User Name: Enter your full email address (including @gmail.com or @your_domain.com
Password: Enter your GMail password.


5. Click More Settings… and then click the Outgoing Server tab.
6. Check the box next to ‘My outgoing server (SMTP) requires authentication’ and select Use same settings as my incoming mail server.

7. Click the Advanced tab, and check the box next to ‘This server requires an encrypted connection (SSL)’ under Incoming Server (IMAP).


8. Check the box next to ‘This server requires an encrypted connection (SSL)’ under Outgoing Server (SMTP), and enter 465 in the Outgoing server (SMTP) box.
9. Click OK.
10. Click Test Account Settings… After receiving the message ‘Congratulations! All tests completed successfully’, click Close.
11. Click Next, and then click Finish.

ACT! to use Outlook/GMail account
1. Tools > Preferences, then click the E-mail tab
2. Click E-mail System Setup button
3. Choose Microsoft Outlook as your E-mail system
4. Add the ACT! database you would like Outlook to access
5. Choose Microsoft Outlook as the E-mail editor
6. Choose Record History option (I chose to stick with “recommended” settings)
7. Choose Attach to ACT! Contacts options (”recommended” on these as well)

So that’s basically it. I would recommend also restarting both ACT! and Outlook to get them working in sync. To verify it is working, click an email address within ACT!, and it should open an Outlook new message window, then from Outlook attempt to attach an email message to a contact within ACT!

02 February 2009

Welcome

Hi, and thanks for checking in. My name is Richard, and among other hats I wear, I am an ACT! Certified Consultant, or ACC. ACT! is the most feature rich and powerful contact management systems available, with so many features and aids to increase your productivity that many users either don't use it to its full potential, or struggle getting it to work best for *their* business.

My goal is to pass along - every so often, maybe once per week - various tidbits of help, tips, ideas, epiphanies, etc that I come across in my day-to-day ACT! work. Hopefully, these items will help you solve a problem, conquer a new task, or just learn something new.

Feel free to comment, and check out all we do at http://www.rbrdatasolutions.com/

Thanks...

Richard Brust
ACT! Certified Consultant
rbrDataSolutions@gmail.com