Showing posts with label Contact Management. Show all posts

12 January 2010

Save Report Filters - Get Report Faster

If you run reports often, you are very familiar with the window that comes up when you start a report - the “General” tab to choose output format and contact lookup, and the other Note/History/Opportunity/Activites/etc tabs where you need to specify both the date range and type of information to output to the report. Furthermore, if you utilize reports often, you find yourself performing the same clicking/selecting on every tab editing dates and checkboxes to get the same report run time after time.

There’s a shortcut to these options, and it’s in the report editor. Go to Reports>Edit Template…, and choose the report you want to edit. When the report editor loads, choose Edit>Define Filters:


This will bring up the same familiar window you get when pulling a report. However, now when you select your criteria - e.g. Send the report to an HTML file using the Current Lookup for All Users, and only select Notes and History for the Current Week - and save the report, those setting will be your defaults for that specific report. If you want the same report format, just with different selections, save the report template with another name. You can have “Notes/History by Week”, “Notes/History by Month”, and so on.

As a bonus, you can also take the most common reports and put that specific report as an icon on the toolbar:
  • Right-Click the toolbar, choose Customize
  • click the 5th tab - Custom Commands and choose "New"
  • Give the command a name, click Browse, navigate to your reports folder, and choose a report (might have to show all files) This is your "command line"
  • Now, go back to the 2nd tab - Commands and choose Custom Commands from the "Categories"
  • The name and command line you specified on the 5th tab will be in there.  Click and drag the new command to any spot on the toolbar.
That's it, your custom filtered specific report is now one-click away from running.

Find the steps you seem to repeat over and over on a regular basis, and look for ways to make that process more efficient. Chances are, it can be done in ACT! Hope this helps…

10 December 2009

Attach a Web Page to an ACT! Contact

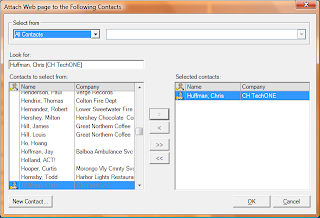
A little known, but very useful feature in ACT! and Internet Explorer is the ability to attach the current web page you are viewing to a specific contact. This can be used to save a specific story about a company, news about a contact, a GMail message, or a blog post from a colleague.

This integration is intalled by default when you install ACT!. You can find it in Internet Explorer under the Tools Command Bar. This is not the menu bar (i.e. File/Edit/View…), rather is usually found towards the right-hand side of the screen, just above the actual web page. If you have tab viewing implemented, it might also be on that same level.


Click on that menu item, choose Attach Web Page to ACT! Contact, which will bring up, from ACT!, the Select Contact window. Choose a contact, and click OK.


Hope this helps, thanks…

26 October 2009

New vCard Utility released

An update to the popular add-on for ACT! 2007 - 2009 (versions 9 - 11), the new vCard Utility not only sends contact information by automatically attaching a vCard to Outlook, it now Saves to File… vCard information, and Imports a vCard into ACT!, creating a new contact record.

More information can be found at http://www.rbrdatasolutions.com/products.htm

Thanks!

06 October 2009

Time Zone and Scheduling Activities

Often ACT! users either share, or synchronize information with other users across different time zones. How do you schedule a conference call with 5 people in 3 different zones? What happens when you send an activity email, or calendar invitation to another user?

Luckily, this is something ACT! takes care of automatically, and you don't need to worry too much about it. ACT! stores times in UTC (Coordinated Universal Time), or GMT (Greenwich Mean Time). Basically, ACT! will store the GMT time, and the localization preferences on your computer will determine the time zone (TZ) offset. In short, based on your computer settings, the ACT! program takes the data (date & time in the database), converts and displays it correctly for you, and any other users to see.

How does this work in action? Let say I have a conference call Friday, October 7th at 11:00am. I put that on my ACT! calendar at *my* time, not converting or adding time zones of the other users. However, if you open the hood and look into the database, you will see the time stored as 2009-10-07 18:00:00 So, if I synchronize with a user/server in another time zone, that date is *still* stored as 2009-10-07 18:00:00 ACT's back-end database (SQL Server) does not care what TZ the computer is in, it's up to the ACT! program itself to convert and display the date correctly. Now, when the user accesses that data on their computer, ACT! automatically converts it to their local time. If they are in Boston (go Sox!), they will have a conference call scheduled at 2:00p, on October 7th.

Sending an Activity eMail, or a calendar file invitation works the same way. Although I can't help if someone in Boston schedules an 8:00am (EST) conf call for colleagues in California (5:00am PST), I do hope this helps you use ACT! more efficiently.

Note: There is one caveat to this system. If you are in one time zone (e.g. CST) scheduling *for* someone in another (e.g. EST), you *will* have to take that into account. i.e. If someone in Pennsylvania specifically says "schedule a meeting for 9:00am", you will need to add it on your computer at 8:00am if you're in CST, 6:00am if you're PST, and so on. When ACT! syncs, they will now have an appointment for 9:00am.

22 August 2009

Send contact information as vCard from ACT!

Have you ever wanted to send either your contact information (the “My Record”), or another contact’s information to someone else? I have had a few inquiries asking how to do this, and unfortunately using Outlook and ACT! it is not possible. So, I have created an ACT! plugin that:
  • gathers a contact’s main information,
  • formats it according to vCard standards,
  • creates a new email message, and
  • attachs the vCard to that message.
More information and some screenshots are at:
http://www.rbrdatasolutions.com/products.htm

This is the first version, written based on the feedback from current clients. If you’d like something added, please feel free to send me a message @ rbrDataSolutions@gmail.com

Thanks!

06 August 2009

Automate Scheduling with Activity Series

An activity series allows you to schedule a pre-defined series of activities with one or more contacts, as well as select an "anchor" date for all activities in the series. Then, by scheduling the anchor event, *all* other events (activities) are automatically scheduled.

Before jumping in to using the function, it is helpful to ensure all the activities related to you, and your business, are defined. The Activity Series only uses the activities currently in the database (i.e. call, meeting, to-do), so if you have something unique to your business process (i.e. Conference Setup, Follow-Up email, Send Quote, etc), define those first.

So, for starters, go to:
Schedule>Manage>Activity Types

The current set of activities will show up, click Add... to customize to your business processes. You can add what you want, but often it's helpful to prefix the activity with the business process as well. E.g. if you have a follow-up email that goes out, and the email is different depending on where the contact came from, you could have a "Conf - eMail", and a "Cold call - eMail" activity. This way, you can define Activity Series for all business processes, not just a generic "eMail" task.

Now, after defining a set of activities, go to:
Schedule>Manage>Activity Series Templates

Follow the series wizard, adding activities as needed. Note that you can also schedule any one, or more, of the activities "for" any other person in your organization (this is the bottom 1/3 of the Activity Information window). A call could be scheduled for you, a letter for the secretary to send, and so on. When you are finished, that series is now available to be scheduled.

Go to: Schedule>Activity Series, chose the series (template) you would like to schedule, the anchor date, and if desired, click on any of the activities, and change the "Scheduled With" (middle of the window). [Or, highlight all of the lines, and change them all at once.] Basically, when scheduling an Activity Series, all activities in that series default to "Schedule With" the contact you are currently viewing. Being able to change the "Schedule With" allows you to choose another contact - e.g. the email task might go to the person you met at the conference (Bob @ XYZ, Inc.), the media packet mailing might go to the president (Frank @ XYZ, Inc.), and so on.

Hope this helps. Again, if you find yourself repeating the same task over and over, or you think "ACT! should do this automatically", you are probably correct. ACT! has many built-in capabilities - let ACT! make life easier.

14 May 2009

Using Notes vs. History

History and Notes are two quite different things. History is for tracking everything you’ve done with the contacts in your database… emails you’ve sent, calls you’ve made, meetings you’ve had, letters you’ve written, etc. It’s for recording the day-to-day history of your relationships. Notes are more general - useful for tracking impressions of a person or business or recording more long term items of interest.

Notes and Histories need to be separated as uniquely different. An ACT! Note should only be used for commentary regarding the contact. It should not include any information regarding any action that has occured. Consider using notes for commentary such as likes and dislikes, product preferences, personal highlights, etc - generally for those things you want to remember or reference quickly.

On the other hand, History is the audit trail of the things you have done for a contact - a chronological accounting of all things that have been done with or for the contact. It is the point of true “contact management”. A completed call and held meeting history will automatically update fields on the contact screen labeled as Last Reach and Last Meeting. These fields are searchable, sortable and reportable.

A few more differences:
  • Unlike Histories, Notes cannot be categorized. There is no Regarding field for a note.
  • Second, Notes do not have a classification or status such as Call Completed, Call Left Message, Meeting Held, To-Do Done, etc.
  • Third, Notes do not have a field to track duration. How much time did this activity take?
  • Fourth, Notes do not update system fields like histories such as “Last Reach” or “Last Meeting” thus making it harder to determine when the last ‘true’ contact or touch was made.
Separating Notes from Histories is smart if the user understand the difference between the two. Instead of simply typing a note the next time a contact calls you, right mouse click and choose “Record History” (anywhere on the contact record), or use the icon on the history tab (see below). Over time you will be glad you did.

20 April 2009

Utilizing Group Membership effectively

Often I run across users that manually add and delete members from a group based on certain criteria. It could be the state they are in, the "type" of contact with which they are working, or the status based on where a prospect is in the opportunity cycle.

If you find yourself performing the same actions, or repetitive actions on a regular basis, that is a signal to look at your program and find out if what you are doing could be automated.

Groups in ACT! can be populated by something called a dynamic query. Here's the quick directions to get started:
  1. In the Group window, create a new group called Opportunities, then on the right-hand side, click the Add/Remove Contacts... button
  2. The top half of the window is where you may have been manually adding contacts. What we want is the bottom half, labelled "Dynamic Members"
  3. Click the Edit Criteria... button
  4. Create the following using the drop down boxes: Type: Opportunity, Field Name: Status, Operator: Equal to (=), Value: Open
  5. Click Add to list, and if desired, click the Preview button.

You have just created a dynamic group, and any contact where an opportunity is opened will be automatically added, and a contact where an opportunity is closed or removed will not be incuded in this group. There are many options with both the Opportunities and Contact fields to help you manage groups of contacts more effectively.

p.s. it is totally possible to have both Dynamic and manually added contacts.