One of the first questions I get when setting up a CRM system - either ACT! or ZoHo CRM is "how do I mail merge?". Below are some reasons why you should not use the email merge directly from SageACT or ZohoCRM, and the alternative you should use. Whatever you use, PLEASE do not think you can use your ISP or GMail to send mass emails.
Showing posts with label gMail. Show all posts
Showing posts with label gMail. Show all posts
24 October 2011


13 September 2011
SageACT! Google Integration
September of 2012 marked a new release of SageACT! - version 14, or as most people call is 2012. As an avid Google user - in fact, I run most of my day-to-day activities in GMail and GCal - the addition of Google integration is most welcome.
This post is not so much about the setup and inner workings, rather more of a "what you get" in the integration.
This post is not so much about the setup and inner workings, rather more of a "what you get" in the integration.
08 March 2011
When to Upgrade
I have found that people upgrade for one or two reasons - because there are new features or requirements that their current system does not have, or their current systems does not integrate with newer software.
So, how do you know if you should be upgrading?
So, how do you know if you should be upgrading?
10 December 2009
Attach a Web Page to an ACT! Contact
A little known, but very useful feature in ACT! and Internet Explorer is the ability to attach the current web page you are viewing to a specific contact. This can be used to save a specific story about a company, news about a contact, a GMail message, or a blog post from a colleague.
This integration is intalled by default when you install ACT!. You can find it in Internet Explorer under the Tools Command Bar. This is not the menu bar (i.e. File/Edit/View…), rather is usually found towards the right-hand side of the screen, just above the actual web page. If you have tab viewing implemented, it might also be on that same level.
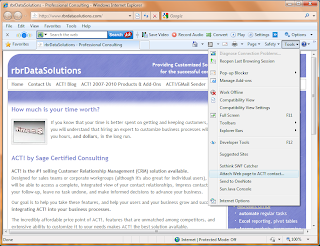
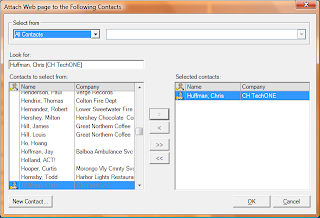
Click on that menu item, choose Attach Web Page to ACT! Contact, which will bring up, from ACT!, the Select Contact window. Choose a contact, and click OK.
This integration is intalled by default when you install ACT!. You can find it in Internet Explorer under the Tools Command Bar. This is not the menu bar (i.e. File/Edit/View…), rather is usually found towards the right-hand side of the screen, just above the actual web page. If you have tab viewing implemented, it might also be on that same level.

Click on that menu item, choose Attach Web Page to ACT! Contact, which will bring up, from ACT!, the Select Contact window. Choose a contact, and click OK.

Hope this helps, thanks…
03 December 2009
Send GMail directly from ACT!
Basically, over the last year, I have received numerous inquiries into integrating GMail with ACT! I have blogged about integrating via Outlook, but often people either don’t want to use Outlook, or don’t have it. This add-on addresses both those issues.
Features:
The add-on creates a new menu item under Tools called WebMail Sender. It is also a toolbar button. Choosing that option will bring up what essentially is a New Mail Message window, with the email address of the current contact in the To: field. Now, fill in the Subject, the body of the email, (and CC: if desired), and click Send.
After sending, if successful, a new History item will be recorded with the date & time, and the Subject of the email as the “Regarding” line in the History item. Additionally, the Last E-Mail system field in ACT! (on top half of screen, under Latest Activities) will be updated. If selected, the body, and names only of the attachments will be recorded in the same History entry.
Please check it out at http://www.rbrdatasolutions.com/products.htm Thanks!!!
Features:
- send mail directlyfrom ACT! through GMail
- HTML editing window
- supports attachments
- automatically populates To: field from current contact
- HTML Signature - even with images. GMail does not even do that!!!
- save/open messages as templates
The add-on creates a new menu item under Tools called WebMail Sender. It is also a toolbar button. Choosing that option will bring up what essentially is a New Mail Message window, with the email address of the current contact in the To: field. Now, fill in the Subject, the body of the email, (and CC: if desired), and click Send.
After sending, if successful, a new History item will be recorded with the date & time, and the Subject of the email as the “Regarding” line in the History item. Additionally, the Last E-Mail system field in ACT! (on top half of screen, under Latest Activities) will be updated. If selected, the body, and names only of the attachments will be recorded in the same History entry.
Please check it out at http://www.rbrdatasolutions.com/products.htm Thanks!!!
07 February 2009
ACT! and GMail integration
The ability to keep track of your emails within ACT! is huge, but what if you use a web-mail service such as GMail? Following are instructions for getting GMail messages - both inbound and outbound - connected with ACT!
There are 3 main steps - enable IMAP in GMail, set up Outlook to access GMail, and then set up ACT! to work with the new Outlook/GMail account. The first step is Google specific, the last step is needed for *any* e-mail account setup to work with ACT!, it is not necessarily GMail specific. There is really only one area that is different than other e-mail accounts, and that is the IMAP settings. [Note: Once Outlook is setup, the ACT!/Outlook link is the same for any e-mail account - ACT! does not care if it's GMail or whatever.]
GMail Account setup
1. Set up a GMail account. (I suspect you have already done this.)
2. Enable IMAP in GMail
a. Sign in to GMail.
b. Click Settings at the top of any GMail page.
c. Click Forwarding and POP/IMAP.
d. Select Enable IMAP.
Outlook Access to GMail Account
3. In Outlook, go to Tools > EMail Accounts
a. Click radio button “Add a new e-mail account”, then click Next
b. Click radio button IMAP, then click Next
4. You should have a small(er) window open with various “information” boxes. Fill in all necessary fields to include the following information:
User Information
Your Name: Enter your name as you would like it to appear in the From: field of outgoing messages.
Email Address: Enter your full email address (username@gmail.com).
Server Information
Incoming mail server (IMAP): imap.gmail.com
Outgoing mail server (SMTP): smtp.gmail.com
Login Information
User Name: Enter your full email address (including @gmail.com or @your_domain.com
Password: Enter your GMail password.

5. Click More Settings… and then click the Outgoing Server tab.
6. Check the box next to ‘My outgoing server (SMTP) requires authentication’ and select Use same settings as my incoming mail server.

7. Click the Advanced tab, and check the box next to ‘This server requires an encrypted connection (SSL)’ under Incoming Server (IMAP).

8. Check the box next to ‘This server requires an encrypted connection (SSL)’ under Outgoing Server (SMTP), and enter 465 in the Outgoing server (SMTP) box.
9. Click OK.
10. Click Test Account Settings… After receiving the message ‘Congratulations! All tests completed successfully’, click Close.
11. Click Next, and then click Finish.
ACT! to use Outlook/GMail account
1. Tools > Preferences, then click the E-mail tab
2. Click E-mail System Setup button
3. Choose Microsoft Outlook as your E-mail system
4. Add the ACT! database you would like Outlook to access
5. Choose Microsoft Outlook as the E-mail editor
6. Choose Record History option (I chose to stick with “recommended” settings)
7. Choose Attach to ACT! Contacts options (”recommended” on these as well)
So that’s basically it. I would recommend also restarting both ACT! and Outlook to get them working in sync. To verify it is working, click an email address within ACT!, and it should open an Outlook new message window, then from Outlook attempt to attach an email message to a contact within ACT!
Subscribe to:
Posts (Atom)

